Creamy Sun-Dried Tomato Pasta

When you want a 15-minute meal, try this Creamy Sun-Dried Tomato Pasta. Using very few ingredients put together at record speed, this recipe will truly get you to pasta heaven. This has become a staple in our home, the kids love it, and the use of coconut milk makes it healthy and luscious.

Have you ever wondered about sun-dried tomatoes? Are they really dried in the sun? Well, I wanted to know as well and here’s what I found out. It seems unclear where sun-dried tomatoes originated, however, it is a fact that Italians dried their tomatoes on their rooftops during the summer. That allowed them to enjoy the valuable nutrition of tomatoes in the winter, when tomatoes were nearly impossible to cultivate. It typically takes 4 to 10 days in the sun for tomatoes to complete the sun-drying process. The tomatoes are usually salted before being placed in the sun to improve the color. The great thing with sun-dried tomatoes is that they keep most of their nutrients, even after they have been dried. They are high in lycopene, antioxidants and vitamin C. Interestingly, according to the USDA, few store-bought sun-dried tomatoes today are actually sun-dried. Manufacturers now favor the use of dehydrators and ovens. The laws and regulations, however, are written in a way that allows manufacturers to still use the term “sun-dried”.

Sun-dried tomatoes became all the rage in North America in the 80s and 90s, where they would be used in recipes, on antipasti platters, as a topping on salads. So much that it became, well, too much. They then lost popularity by the end of the 90s from overuse. In this recipe, I go against all odds and use a whole jar of them. I personally prefer sun-dried tomatoes packed in oil and spices, rather than the very dried ones in a plastic bag. Simply make sure to blot the tomatoes with paper towels to remove excess oil before chopping.

For other quick pasta recipes, check out this Rainbow Pasta and this Pasta with Greens in Creamy Wine Sauce.

Print

Creamy Sun-Dried Tomato Pasta

  • Author: Karine K
  • Prep Time: 5 minutes
  • Cook Time: 10 minutes
  • Total Time: 15 minutes
  • Yield: 4 servings 1x

Ingredients

Scale
  • 1 lb pasta of choice
  • 2 tablespoons olive oil
  • 1 cup sun-dried tomatoes, finely chopped
  • 7 cloves garlic, minced
  • 1 onion, finely chopped
  • 5 tablespoons flour
  • 3 cups plant milk of choice
  • Sea salt and pepper, to taste
  • Fresh basil, to serve

Instructions

Cook the pasta according to package directions. Drain, reserving about 1/2 cup cooking liquid, if desired, and set aside.

In a large skillet, heat the olive oil over medium heat. Add the sun-dried tomatoes, garlic and onion and sauté, stirring often, until the onion is translucent, about 5 minutes. Slowly add the flour, while stirring. Let cook for 1 minute. Slowly whisk in the milk, ensuring there are no clumps. Add the milk, while whisking, and let simmer for 5 minutes, until thick and creamy. At this point, you may want to add more milk or the pasta cooking liquid, to achieve the desired consistency. Add sea salt and pepper, to taste. Combine the pasta with the sauce and serve, garnished with fresh basil. Bon appétit!

Keywords: pasta, sun-dried tomatoes, creamy

Did you make this recipe?

Share a photo and tag us — we can’t wait to see what you’ve made!


Print

Pâtes crémeuses aux tomates séchées

  • Author: Karine K
  • Prep Time: 5 minutes
  • Cook Time: 10 minutes
  • Total Time: 15 minutes
  • Yield: 4 portions 1x

Ingredients

Scale
  • 1 livre de pâtes, au choix
  • 2 c. à soupe d’huile d’olive
  • 1 tasse de tomates séchées, hachées finement
  • 7 gousses d’ail, émincées
  • 1 oignon, haché finement
  • 5 c. à soupe de farine
  • 3 tasses de lait de coco (ou d’amande ou d’avoine)
  • Sel de mer et poivre, au goût
  • Basilic frais, haché, pour servir

Instructions

Cook the pasta according to package directions. Drain, reserving about 1/2 cup cooking liquid, if desired, and set aside.

In a large skillet, heat the olive oil over medium heat. Add the sun-dried tomatoes, garlic and onion and sauté, stirring often, until the onion is translucent, about 5 minutes. Slowly add the flour, while stirring. Let cook for 1 minute. Slowly whisk in the milk, ensuring there are no clumps. Add the milk, while whisking, and let simmer for 5 minutes, until thick and creamy. At this point, you may want to add more milk or the pasta cooking liquid, to achieve the desired consistency. Add sea salt and pepper, to taste. Combine the pasta with the sauce and serve, garnished with fresh basil. Bon appétit!

Keywords: pâtes, tomates séchées, sauce

Did you make this recipe?

Share a photo and tag us — we can’t wait to see what you’ve made!

Israeli Couscous and Roasted Cauliflower with Tahini Sauce

Flavor level: 100!

This Israeli Couscous and Roasted Cauliflower with Tahini Sauce is exploding in textures. The tang of the tahini sauce with the chewy texture of the couscous makes this dish one to remember.

Israeli couscous, from its actual name ptitim, and sometimes referred to as pearl couscous, is said to have been created in the 1950s, during the austerity period in Israel, when rice supplies were scarce. Israel’s prime minister at the time requested that a wheat-based product be developed to be used as a substitute. Ptitim originally was made in the shape of rice, but inspired by couscous, the company started producing the small ball-shaped variety. Ptitim is made by extruding dough through a mold, cutting and toasting it, giving its distinct nutty flavor. It is versatile and can be used to replace pasta or rice in many instances. It is often prepared with fried onions or garlic, and vegetables or meat can be added.

In this recipe, we envelop the Israeli couscous and the deeply roasted cauliflower with tahini sauce. We then add some sautéed garlic and pine nuts, for an extra decadent warm dish that’ll blow your socks off. Yes, there are many little things to put together, but they can all be done while your cauliflower roasts. Try it and let me know what you think!

For another recipe using cauliflower and tahini, check this out: Cumin Roasted Cauliflower with Tahini Sauce.

Print

Israeli Couscous and Roasted Cauliflower with Tahini Sauce

  • Author: Karine K
  • Prep Time: 10 minutes
  • Cook Time: 35 minutes
  • Total Time: 45 minutes
  • Yield: 46 servings 1x

Ingredients

Scale

For the Roasted Cauliflower

  • 1 large head of cauliflower, cut into small florets
  • 6 garlic cloves, peeled and left whole
  • 1 red bell pepper, sliced
  • 3 tablespoons olive oil
  • Pinch of red pepper flakes (optional)
  • Sea salt and pepper

For the Israeli Couscous

  • 2 tablespoons olive oil
  • 2 cups Israeli couscous
  • 3 cups water
  • 1 teaspoon sea salt

For the Tahini Sauce

  • 1/3 cup tahini
  • 1/3 cup water
  • Juice of 1 juicy lemon
  • Sea salt and pepper, to taste
  • Extra lemon slices, to serve

For the Pine Nuts and Parsley

  • 2 tablespoons olive oil
  • 3 cloves garlic, chopped
  • 1/4 cup pine nuts
  • 1/4 cup fresh parsley, chopped

Instructions

For the Roasted Cauliflower

Preheat oven to 425˚F (225˚C). On a parchment-lined baking sheet, toss together the cauliflower, garlic, red bell pepper slices, olive oil, red pepper flakes, if using, and sea salt and pepper, to taste. Place in the oven and roast for 30-35 minutes, tossing halfway through, until vegetables are charred in spots.

For the Israeli Couscous

In a skillet, heat the olive oil over medium heat. Add the couscous and toast, stirring often, for 3 to 5 minutes.* In a medium saucepan, bring the water to a boil. Add the couscous and the salt. Return to a boil, reduce the heat, cover and cook until tender, about 15 minutes. Drain off any remaining water.

For the Tahini Sauce

Place all ingredients in a small bowl and whisk until smooth.

For the Pine Nuts and Parsley

Heat the olive oil in a small skillet over medium heat. Add the garlic and the pine nuts and sauté, stirring often, until the garlic looses its bite and the pine nuts take on some color, about 3 to 5 minutes.

To assemble, toss together the roasted vegetables, the couscous and the pine nuts and parsley garnish. Add the tahini sauce and mix again. Serve with some lemon slices on the side. Bon appétit!


Notes

*This step is optional. It does, however, bring out the yummy nutty taste of the couscous.

Keywords: Israeli couscous, cauliflower, pine nuts, tahini

Did you make this recipe?

Share a photo and tag us — we can’t wait to see what you’ve made!


Print

Couscous israélien avec chou-fleur au four et sauce tahini

  • Author: Karine K
  • Prep Time: 10 minutes
  • Cook Time: 35 minutes
  • Total Time: 45 minutes
  • Yield: 4 à 5 portions 1x

Ingredients

Scale

Pour le chou-fleur au four

  • 1 grosse tête de chou-fleur, coupée en petits fleurons
  • 6 gousses d’ail, pelées et entières
  • 1 poivron rouge, épépiné et coupé en lanières
  • 3 c. à soupe d’huile d’olive
  • Pincée de flocons de piments chili broyés (en option)
  • Sel de mer et poivre, au goût

Pour le couscous israélien

  • 2 c. à soupe d’huile d’olive
  • 2 tasse de couscous israélien
  • 3 tasses d’eau
  • 1 c. à thé de sel de mer

Pour la sauce tahini

  • 1/3 tasse de tahini
  • 1/3 tasse d’eau
  • Jus d’un demi citron bien juteux
  • Sel de mer et poivre, au goût
  • Tranches de citron, pour servir

Pour les noix de pins et le persil

  • 2 c. à soupe d’huile d’olive
  • 3 gousses d’ail, hachées
  • 1/4 tasse noix de pin
  • 1/4 tasse persil frais, haché

Instructions

Pour le chou-fleur au four

Préchauffer le four à 425˚F (225˚C). Sur une plaque de cuisson préalablement recouverte de papier parchemin, mélanger les fleurons de chou-fleur, les gousses d’ail, le poivron rouge, l’huile d’olive, les flocons de piments chili broyés, si désiré, et du sel de mer et poivre, au goût. Mettre au four et rôtir pendant 30 à 35 minutes, jusqu’à ce que les légumes soient bien dorés. Retourner les légumes autour de la mi-cuisson.

Pour le couscous israélien

Dans une poêle, chauffer l’huile d’olive à feu moyen. Ajouter le couscous israélien et faire sauter en brassant, de 3 à 5 minutes.* Dans un chaudron moyen, porter l’eau à ébullition. Ajouter le couscous israélien et le sel de mer. Porter de nouveau à ébullition, réduire le feu, couvrir et cuire jusqu’à ce que le couscous soit tendre, environ 15 minutes. Retirer du feu et égoutter, si nécessaire.

Pour la sauce tahini

Mettre tous les ingrédients dans un petit bol et fouetter jusqu’à l’obtention d’une consistence onctueuse.

Pour les noix de pin et le persil

Chauffer l’huile d’olive dans une petite poêle à feu moyen. Ajouter l’ail et les noix de pin. Faire revenir, en brassant souvent, environ 3 à 5 minutes.

Pour assembler, mélanger le chou-fleur, le couscous israélien, la garniture de noix de pin et persil. Arroser de la sauce tahini et mélanger à nouveau. Servir avec des tranches de citron frais. Bon appétit!

Notes

*Cette étape n’est pas essentielle, mais rehausse grandement le goût du couscous.

Keywords: couscous israélien, chou-fleur, noix de pin, tahini

Did you make this recipe?

Share a photo and tag us — we can’t wait to see what you’ve made!

Pasta al Limone with Asparagus

Pasta al Limone with Asparagus

A creamy and plant-based take on an Italian classic, this Pasta al Limone with Asparagus is quick to make and completely decadent. Pretty enough for company, it can also satisfy weeknight cravings, as it takes less than 30 minutes to put together.

For other fabulous pasta recipes, check out this Effortless Pumpkin and Spinach Pasta Sauce and this Pasta with Greens in Creamy Wine Sauce.

Print

Pasta al Limone with Asparagus

  • Author: Karine K
  • Prep Time: 5 minutes
  • Cook Time: 25 minutes
  • Total Time: 30 minutes
  • Yield: 2 servings 1x

Ingredients

Scale

For the Lemon Cashew Cream:

  • 1/2 cup raw cashews
  • 1/2 cup water
  • 2 tablespoons lemon juice
  • 1/4 teaspoon salt

For the Pasta:

  • 8 oz. pasta of choice
  • 2 tablespoons olive oil
  • 4 spring onions, sliced thin, or 1/2 onion, chopped
  • 2 cups fresh asparagus, sliced thin on the diagonal
  • 4 cloves garlic, minced
  • 3 wide and long strips of lemon zest
  • 1/4 teaspoon red chili flakes
  • 4 tablespoons fresh basil, chopped
  • Juice of 2 lemons
  • Sea salt and pepper, to taste

Instructions

Cook pasta in a large pot of salted boiling water until al dente. Drain, reserving 1 cup of the cooking liquid. Meanwhile, make the Lemon Cashew Cream by blending all the ingredients in a high-speed blender until smooth. Set aside.

In a large skillet, heat the oil over medium-high heat. Add the spring onions and the asparagus. Season with salt and cook, stirring, until just beginning to take on color, about 3 minutes. Add the garlic, the lemon zest and red chili flakes, and cook 1 minute more. Add the lemon cashew cream, the lemon juice, the pasta, and stir well until well-coated, adding some of the pasta cooking liquid, as needed. Add 3 tablespoons of the fresh basil and season to taste with sea salt and pepper. Divide among bowls and top with remaining fresh basil. Bon appétit!

Did you make this recipe?

Share a photo and tag us — we can’t wait to see what you’ve made!


Print

Spaghetti al limone avec asperges

Une version végé d’un grand classique italien, ce spaghetti al limone avec asperges est rapide à préparer et totalement décadent. Bien que ce plat soit assez joli pour une soirée entre amis, il est aussi parfait pour un soir de semaine, comme il ne requiert moins de 30 minutes en temps de préparation.

  • Author: Karine K
  • Prep Time: 5 minutes
  • Cook Time: 25 minutes
  • Total Time: 30 minutes
  • Yield: 2 portions 1x

Ingredients

Scale

Pour la crème de noix de cajou au citron :

  • 1/2 tasse de noix de cajou brutes
  • 1/2 tasse d’eau
  • 2 c. à soupe de jus de citron
  • 1/4 c. à thé de sel

Pour les pâtes :

  • 8 onces de spaghetti, ou de pâtes au choix
  • 2 c. à soupe d’huile d’olive
  • 4 oignons de printemps, tranchés mince, ou 1/2 oignon, haché
  • 2 tasses d’asperges fraîches, tranchées mince sur la diagonale
  • 4 gousses d’ail, émincées
  • 3 longues et larges bandes de zeste de citron
  • 1/4 c. à thé de flocons de chili broyés
  • 4 c. à soupe de basilic frais, haché
  • Jus de 2 citrons
  • Sel de mer et poivre, au goût

Instructions

Cuire les pâtes dans un grand chaudron d’eau bouillante salée jusqu’à ce qu’elles soient al dente. Égoutter en réservant 1 tasse du liquide de cuisson. Pendant ce temps, mélanger tous les ingrédients de la crème de noix de cajou au citron dans un mélangeur haute-vitesse. Réserver.

Dans une grande poêle, chauffer l’huile d’olive à feu moyen-élevé. Ajouter les oignons de printemps et les asperges. Assaisonner de sel de mer et cuire, en brassant souvent, jusqu’à ce que les légumes ramollissent, environ 3 minutes. Ajouter l’ail, le zeste de citron et les flocons de chili, et cuire pendant 1 minute de plus. Ajouter la crème de noix de cajou, le jus de citron, les pâtes, et mélanger vigoureusement jusqu’à ce que les pâtes soient bien enrobées de sauce, en ajoutant du liquide de cuisson. Ajouter 3 c. à soupe de basilic frais et assaisonner au goût de sel de mer et de poivre. Servir dans des assiettes creuses, garni du reste de basilic frais. Bon appétit!

Keywords: pasta, spaghetti, citron, asperges

Did you make this recipe?

Share a photo and tag us — we can’t wait to see what you’ve made!

Edamame Potstickers

Edamame Potstickers
Edamame Potstickers

Potstickers or dumplings? It’s all a little confusing. From my research, it seems that dumplings are simply steamed and potstickers have a crispy exterior due to the way that they are cooked, as you’ll see below. But who doesn’t love them? These little packets of flavor, taking their origin in China, traditionally contain a mixture of pork, cabbage, scallions, and ginger. For this recipe, we forego the meat and use the protein-rich edamame as a base. In addition, these Edamame Potstickers contain shiitake mushrooms and a few other simple ingredients for a dish that is easy to make and secures a high dose of umami. We serve them with a quick and simple sauce made from tamari (or soy sauce), sambal oelek and lime juice, so plan for a little extra of those ingredients. They are so satisfying!

If you make this recipe, I’d love to see it! Please tag @LivityGardens on social.

Print

Edamame Potstickers

  • Author: Karine K
  • Prep Time: 30 minutes
  • Cook Time: 15 minutes
  • Total Time: 45 minutes
  • Yield: 6 servings 1x
  • Method: Stovetop
  • Cuisine: Chinese

Ingredients

Scale
  • 2 cups frozen shelled edamame, thawed
  • 6 ounces shiitake mushrooms, cleaned and chopped (about 3 cups)
  • 3 scallions, chopped, plus more for serving
  • 2-inch piece of fresh ginger, chopped
  • 23 cloves garlic
  • 1/4 cup cilantro, coarsely chopped
  • 2 tablespoons tamari or soy sauce, plus more for the sauce
  • 1 teaspoon sambal oelek, plus more for the sauce
  • 10-ounce pack of gyoza/potsticker wrappers (about 50 wrappers)
  • 35 tablespoons grapeseed oil, divided
  • Fresh lime juice, for the sauce

Instructions

Place the edamame, shiitake mushrooms, scallions, ginger, garlic, cilantro, tamari and sambal oelek in the bowl of a food processor. Pulse until coarsely processed, but well-combined.

Spread some wrappers, about 10 at a time, onto a clean work surface. Place 1 heaping teaspoon of the filling onto the center of the wrappers. Moisten the edge with water. Fold the wrappers in half over the filling, pleating the edges, as desired, pressing to seal shut. Repeat until you use all the filling. You should have about 50 potstickers. You may keep the potstickers covered with a moist paper towel and some plastic wrap until ready to cook.

Heat 1 tablespoon grapeseed oil in a large non-stick skillet over medium-high heat. Add potstickers side-by-side. Cook for 1-2 minutes or until lightly browned on bottom. Add 1/3 cup water to the skillet, cover and cook, over medium heat until the pan is dry, about 3-4 minutes. Serve, browned-side up, with a quick sauce made simply by mixing some tamari, sambal oelek and fresh lime juice, to taste. Garnish with scallions and fresh cilantro. Bon appétit!

Keywords: potstickers, dumplings, edamame, shiitake, Chinese

Did you make this recipe?

Share a photo and tag us — we can’t wait to see what you’ve made!


Print

Potstickers aux edamame

On dit potstickers ou dumplings? Selon mes recherches, il semble que les dumplings sont cuits à la vapeur, alors que les potstickers ont un extérieur croustillant, grâce à la façon dont on les cuit. Dans les deux cas, il est impossible de résister. Ces petites pochettes, originalement de la Chine, sont traditionnellement remplies de porc, de chou, d’oignon vert et de gingembre, entre autres. Dans cette recette, nous remplaçons la viande par des edamames, pour un plat riche en protéines. De plus, le mélange contient des champignons shiitake et quelques autres ingrédients clé, pour des potstickers facile à faire et remplis de saveur. Prévoyez un peu plus de sauce tamari (ou soya), sambal oelek et jus de lime pour servir. J’espère qu’ils vous plairont.

  • Author: Karine K
  • Prep Time: 30 minutes
  • Cook Time: 15 minutes
  • Total Time: 45 minutes
  • Yield: 6 portions 1x
  • Cuisine: Chinoise

Ingredients

Scale
  • 2 tasses d’edamames surgelés, décongelés
  • 6 onces de champignons shiitake, hachés (environ 3 tasses)
  • 3 oignons verts, hachés, un peu plus pour la garniture
  • 2 c. à soupe de gingembre frais, haché
  • 2 à 3 gousses d’ail
  • 1/4 tasse de coriandre fraîche, hachée
  • 2 c. à soupe de tamari ou de sauce soya, un peu plus pour la sauce
  • 1 c. à thé de sambal oelek, un peu plus pour la sauce
  • 1 paquet de 10 onces de pâtes à potstickers (environ 50 pâtes)
  • 3 à 5 c. à soupe d’huile de pépin de raisin, séparées
  • Jus de lime frais, pour la sauce

Instructions

Déposer les edamames, les champignons, les oignons verts, le gingembre, l’ail, la coriandre fraîche, la sauce tamari et le sambal oelek dans le bol d’un robot culinaire. Mélanger jusqu’à l’obtention d’un mélange grossier, mais uniforme.

Étendre 10 pâtes sur une surface de travail propre. Placer une généreuse cuillère à thé de la farce au centre de la pâte. Humecter d’eau la bordure de la pâte et plier en demi-lune sur la farce, effectuant des plis, au goût, en pressant afin de bien sceller. Continuer jusqu’à l’utilisation de toute la farce. Vous devriez avoir environ 50 potstickers. Vous pouvez les conserver sur une tôle recouverte de papier parchemin et recouverte d’un essuie-tout humide et d’emballage plastique. Placer au réfrigérateur jusqu’au moment de cuire.

Chauffer 1 c. à soupe d’huile de pépin de raisin dans une poêle anti-adhésive à feu moyen-élevé. Ajouter des potstickers côte à côte. Cuire pendant 1 à 2 minutes, ou jusqu’à ce que le dessous commence à dorer. Ajouter 1/3 tasse d’eau à la poêle, couvrir et cuire à feu moyen pendant 3 à 4 minutes, ou jusqu’à ce que l’eau s’évapore. Répéter jusqu’à ce que tous les potstickers soient cuits. Servir, le côté doré vers le haut, avec une sauce rapide faite d’un mélange de tamari, sambal oelek et jus de lime, au goût. Garnir d’oignons verts et de coriandre fraîche. Bon appétit!

Keywords: potstickers, dumplings, edamames, champignons, cuisine chinoise

Did you make this recipe?

Share a photo and tag us — we can’t wait to see what you’ve made!

Effortless Pumpkin and Spinach Pasta Sauce

Effortless Pumpkin and Spinach Pasta Sauce

When it’s pumpkin season, I love taking advantage of their freshness and abundance. Plus, they are so versatile and fun to incorporate in a variety of dishes and cuisines. In this Effortless Pumpkin and Spinach Pasta Sauce, you will get maximum satisfaction with a minimum of ingredients. The ingredients are all pantry staples, that you may already have. Just get yourself one of those pie pumpkins, also called sugar pumpkins. And if you cook it the day before, you’ll be in the kitchen no more than 15 minutes the day of. You can even put your sauce in a jar and store in the fridge until it’s time to eat. This recipe is a simple and easy way to enjoy the bounty of the season.

For other great pumpkin recipes, check out my Autumn-Spiced Pumpkin Raviolis with Sage Brown Butter and my Pumpkin, Fennel and Fig Tagine.

If you make this recipe, I’d love to see it. Please tag @LivityGardens on social.

Print

Effortless Pumpkin and Spinach Pasta Sauce

  • Author: Karine K
  • Prep Time: 5 minutes
  • Cook Time: 45 minutes
  • Total Time: 50 minutes
  • Yield: 4 servings 1x
  • Method: Make Ahead

Ingredients

Scale
  • 3 tablespoons olive oil
  • 1 pie pumpkin (also called sugar pumpkin), cut in half, seeded
  • 4 cloves garlic, not peeled
  • 1 onion, thinly sliced
  • 4 tablespoons tomato paste
  • 1 1/2 cup coconut milk
  • 1/8 teaspoon smoked paprika
  • 2 large handfuls fresh spinach
  • Sea salt and pepper, to taste

Instructions

Preheat your oven to 350˚F (175˚C). Place two garlic cloves in each of the cavities of the pumpkin halves. Place on a parchment-lined baking sheet and pour 1 tablespoon of olive oil in each cavity. Add generous pinches of sea salt and pepper and, using your hands, rub the oil all over the cloves and the pumpkin halves. Place the halves, cut side down and hide the cloves under. Place in the oven and roast for about 45 minutes. (Doing this the day before while you do something else, is a great way to cut your time in the kitchen.) When the pumpkin is cooked through and tender when pierced with a small knife, take out of the oven and let rest.

In a skillet, heat the remaining 1 tablespoon of olive oil over medium-high heat. Add the onion, reduce the heat to medium and let cook, until brown and caramelized, 7-8 minutes, stirring often. Add the tomato paste and let cook, while stirring, until dark red and fragrant, about 3-4 minutes. Add the coconut milk and mix until well-combined. Add the smoked paprika, sea salt and pepper to taste (about 1 teaspoon salt, 1/2 teaspoon pepper), remove from the heat and transfer to a blender. Remove the skin from the pumpkin halves and the garlic cloves and add to the blender. Process until smooth. Return to the same skillet and add the spinach over low flame, stirring until they wilt. Remove from the heat and serve with your favorite pasta. Bon appétit!

Keywords: pasta, pumpkin, spinach

Did you make this recipe?

Share a photo and tag us — we can’t wait to see what you’ve made!


Print

Sauce simple à la citrouille et aux épinards

Quand c’est la saison des citrouilles, j’adore en profiter au maximum et découvrir de nouvelles façons d’apprêter ce légume plutôt effacé du côté culinaire. On décore les citrouilles, mais on oublie souvent d’apprécier leur côté si versatile en cuisine. Dans cette recette de sauce pour pâtes à la citrouille et aux épinards, la citrouille est mise en vedette et simplement rehaussée d’ingrédients simples que vous avez peut-être déjà sous la main. De plus, si vous faites cuire votre citrouille la veille, vous réduirez votre temps dans la cuisine la journée même. Une façon simple et goûteuse de célébrer les saveurs de la saison.

  • Author: Karine K
  • Prep Time: 5 minutes
  • Cook Time: 45 minutes
  • Total Time: 50 minutes
  • Yield: 4 portions 1x

Ingredients

Scale
  • 3 c. à soupe d’huile d’olive
  • 1 petite citrouille (environ 1 à 1,5 kg), coupée en deux, sans les graines
  • 4 gousses d’ail, avec la peau
  • 1 oignon, tranché mince
  • 4 c. à soupe de pâte de tomate
  • 1 1/2 tasse de lait de coconut
  • 1/8 c. à thé de paprika fumé
  • 2 grosses poignées d’épinards frais
  • Sel de mer et poivre, au goût

Instructions

Préchauffer le four à 175˚C (350˚F). Placer les gousses d’ail dans chacune des deux cavités de la citrouille. Déposer sur une tôle de cuisson, préalablement recouverte de papier parchemin. Verser 1 c. à soupe d’huile d’olive dans chacune des cavités. Saupoudrer généreusement de sel de mer et de poivre. Avec les mains, répandre l’huile sur toutes les surfaces des gousses d’ail et de la citrouille. Placer les demi-citrouilles, la chair vers le bas, sur la tôle de cuisson et placer les gousses d’ail sous chacune. Transférer au four et cuire pendant environ 40 à 45 minutes. Lorsque la citrouille est cuite et tendre, retirer du four et laisser reposer. 

Dans une grande poêle, chauffer 1 c. à soupe d’huile d’olive à feu moyen-élevé. Ajouter l’oignon, réduire le feu à moyen et laisser cuire, jusqu’à ce qu’il soit doré et caramélisé, 7 à 8 minutes, en brassant souvent. Ajouter la pâte de tomate et laisser cuire jusqu’à ce que celle-ci soit rouge foncé et aromatique, environ 3 à 4 minutes. Ajouter le lait de coconut et bien mélanger. Ajouter le paprika fumé, le sel et le poivre, au goût (ou 1 c. à thé de sel et 1/2 c. à thé de poivre) et retirer du feu. Transférer le contenu dans un mélangeur et ajouter la chair de citrouille et les gousses d’ail, en prenant soin de retirer la peau. Mélanger jusqu’à l’obtention d’un mélange onctueux. Remettre dans la même poêle et chauffer à feu doux en ajoutant les épinards. Bien mélanger jusqu’à ce que les épinards se fanent. Retirer du feu et servir avec vos pâtes préférées. Bon appétit!

Keywords: pâtes, citrouille, épinards

Did you make this recipe?

Share a photo and tag us — we can’t wait to see what you’ve made!

Tofu Satay with Vegetables, Noodles and Peanut Sauce

Tofu Satay with Vegetables, Noodles and Peanut Sauce

Satay is an Indonesian dish, usually made with meat, skewered onto bamboo sticks and grilled. In this Tofu Satay with Vegetables, Noodles and Peanut Sauce, lemongrass gives a nice splash of citrusy aroma that will be perfectly balanced by the creaminess of the sauce. We also broil the tofu, at the end of cooking, to ensure a nice char on the cubes for maximum texture and flavor. Feel free to put your tofu on skewers for an authentic presentation.

If you make this recipe, I’d love to see it. Please tag @LivityGardens on social and use the hashtag #LivityGardens.

For another great tofu recipe, check out The Best Baked BBQ Tofu You’ll Ever Have.

Print

Tofu Satay with Vegetables, Noodles and Peanut Sauce

  • Author: livitygardens
  • Prep Time: 20 minutes
  • Cook Time: 30 minutes
  • Total Time: 50 minutes
  • Yield: 4 servings 1x
  • Method: Oven

Ingredients

Scale

For the Marinade:

  • 2 1/2 teaspoons ground coriander
  • 1 teaspoon ground cumin
  • 1 lemongrass stalk, first 6 inches only, trimmed
  • 1 shallot, peeled and chopped
  • 2 garlic cloves
  • 1” fresh ginger, peeled
  • 1/4 cup coconut milk
  • 2 dates
  • 2 tablespoons tamari or soy sauce
  • 2 tablespoons lime juice
  • 1/2 teaspoon turmeric
  • 1 bloc of firm tofu, pressed and cubed

For the Peanut Butter Sauce:

  • 4 tablespoons peanut butter
  • 2 tablespoons soy sauce or tamari
  • 2 tablespoons coconut milk
  • 1 tablespoon lime juice
  • 2 teaspoons chili-garlic paste
  • 1 teaspoon ginger, minced
  • 1 teaspoon maple syrup
  • 1 clove garlic, minced

For the Assembly:

  • 1 bunch broccolette
  • 1 red bell pepper, sliced
  • 12 tablespoon(s) olive oil
  • 1 package of noodles, cooked according to package directions
  • Garnishes: Fresh lime quarters, roasted peanuts, sliced green onions

Instructions

In the bowl of a food processor, place the coriander and cumin, the lemongrass, shallot, garlic, ginger, coconut milk, dates, soy sauce or tamari, lime juice and turmeric. Process until a homogenous consistency is achieved. Pour the marinade in a shallow bowl and add the tofu cubes. Mix until well-coated and let stand for 30 minutes.

Meanwhile, preheat the oven to 350˚. Make the peanut sauce by whisking all the sauce ingredients in a medium bowl, until smooth and well-combined. Keep aside.

After 30 minutes, place the tofu cubes on a parchment-lined baking sheet, keeping the marinade for later. Place in the oven and bake for 15 minutes. On a second parchment-lined baking sheet, place the broccolette and the red pepper and rub with olive oil, sea salt and pepper. After baking for 15 minutes, turn the tofu cubes over and brush them with the rest of the marinade. Place back in the oven, along with the vegetable baking sheet, and bake for 10 minutes. Take the vegetables out of the oven and place the tofu on the top rack to broil. Broil, while checking to make sure it doesn’t burn, for 3-5 minutes, until the sides are gently charred. Serve the tofu on a bed of cooked noodles along with the vegetables and top with the peanut sauce. Garnish with roasted peanuts, some fresh lime juice, and green onions. Bon appétit!


Keywords: tofu, satay, peanut, bowl

Did you make this recipe?

Share a photo and tag us — we can’t wait to see what you’ve made!

Print

Bol de tofu satay avec sauce au beurre d’arachides

  • Author: livitygardens
  • Prep Time: 15 minutes + marinating
  • Cook Time: 40 minutes
  • Total Time: 1 hour
  • Yield: 4 servings 1x
  • Method: Four

Ingredients

Scale

Pour la marinade:

  • 2 1/2 c. à thé de coriandre moulue
  • 1 c. à thé de cumin moulu
  • 1 bâton de citronnelle, les 15 premiers centimètres seulement, écossé
  • 1 échalote française, pelée et en quartiers
  • 2 gousses d’ail
  • 1 morceau de gingembre de 2 cm, pelé
  • 1/4 tasse de lait de coconut
  • 2 dates, sans le noyau
  • 2 c. à soupe de sauce soya ou tamari
  • 2 c. à soupe de jus de lime
  • 1/2 c. à thé de curcuma
  • 1 bloc de tofu ferme, pressé et coupé en cubes

Pour la sauce au beurre d’arachides:

  • 4 c. à soupe de beurre d’arachides crémeux
  • 2 c. à soupe de sauce soya ou tamari
  • 2 c. à soupe de lait de coconut
  • 1 c. à soupe de jus de lime
  • 2 c. à thé de pâte chili-ail
  • 1 c. à thé de gingembre frais
  • 1 c. à thé de sirop d’érable
  • 1 gousse d’ail, émincée

Pour l’assemblage:

  • 1 botte de broccolette
  • 1 poivron rouge, tranché
  • 1 à 2 c. à soupe d’huile d’olive
  • 1 paquet de nouilles au choix, cuites selon les directives sur l’emballage
  • Garnitures: quartiers de lime, arachides grillées, oignons verts tranchés

Instructions

Dans le bol d’un robot culinaire, placer la coriandre et le cumin, ajouter la citronnelle, l’échalote française, l’ail, le gingembre, le lait de coconut, les dates, la sauce soya ou tamari, le jus de lime et le curcuma. Pulser jusqu’à l’obtention d’une texture homogène. Transférer la marinade dans un bol et ajouter les cubes de tofu. Bien mélanger. Laisser reposer pendant 30 minutes.

Préchauffer le four à 350˚. Pour faire la sauce au beurre d’arachides, dans un bol moyen, fouetter le beurre d’arachides, la sauce soya ou tamari, le lait de coconut, le jus de lime, la pâte chili-ail, le sirop d’érable, le gingembre, et l’ail. Réserver. Déposer les cubes de tofu sur une plaque de cuisson préalablement recouverte de papier parchemin. Mettre au four et cuire pendant 15 minutes. Sur une autre plaque de cuisson, déposer la broccolette et les tranches de poivron rouge. Assaisonner d’huile d’olive, de sel de mer et de poivre.

Après 15 minutes, retirer le tofu du four et badigeonner du reste de la marinade. Mettre de nouveau au four, ainsi que la plaque de légumes, et cuire pendant 10 minutes de plus. Retirer les légumes du four, réserver, et placer le four à broil. Griller le tofu, sur la plaque supérieure du four, pendant 3 à 5 minutes, en jetant un oeil pour s’assurer que le tofu ne brûle. Servir le tofu sur un lit de nouilles avec les légumes et napper de la sauce au beurre d’arachides. Garnir d’arachides grillées, de quartiers de lime et d’oignons verts. Bon appétit!

Keywords: tofu, satay, arachides, bol

Did you make this recipe?

Share a photo and tag us — we can’t wait to see what you’ve made!

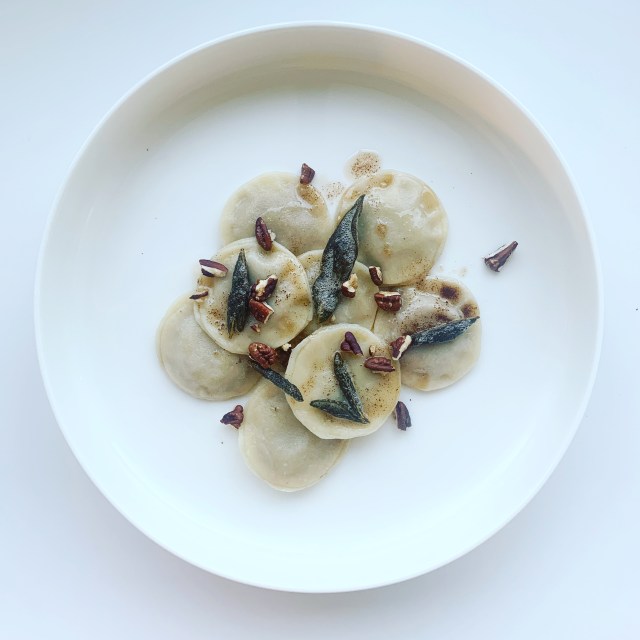
Autumn-Spiced Pumpkin Raviolis with Sage Brown Butter

Autumn-Spiced Pumpkin Raviolis with Sage Brown Butter

When the weather starts to cool in Arizona (I’m talking 90-degree weather!), I start to crave comfort and cooked food. These Autumn-Spiced Pumpkin Raviolis with Sage Brown Butter are fancy enough for company, but are also great to make with kids. It will take a bit of your time, but all the steps are very easy, and trust me the result is beyond words. I decided to flavor them with spices that reminds of the harvest and this special time of the year where everything is bountiful and full of the last rays of sunshine. I hope you enjoy them!

If you make this recipe, I’d love to see it. Please tag @LivityGardens on Instagram and use the hashtag #LivityGardens.

For other wonderful fall-inspired recipes, check out this Autumn Ital Stew and this Pumpkin, Fennel and Fig Tagine.

Print

Autumn-Spiced Pumpkin Raviolis with Sage Brown Butter

  • Author: Karine K
  • Prep Time: 30 minutes
  • Cook Time: 45 minutes
  • Total Time: 1 hour 15 minutes
  • Yield: 4 servings 1x

Ingredients

Scale
  • 1 cooking pumpkin, halved and seeded
  • 4 cloves of garlic, left whole
  • 2 tablespoons olive oil
  • 1 cup semolina flour
  • 1 cup all-purpose flour
  • 1/2 cup aquafaba (the liquid from a can of chickpeas, keep the chickpeas for another use)
  • 3 tablespoons water
  • 1/2 cup toasted pecans, plus more for serving
  • 1/8 teaspoon cinnamon
  • 1/8 teaspoon ground cloves
  • 1/8 teaspoon grated nutmeg
  • 9 tablespoons butter, divided
  • 1 teaspoon maple syrup
  • 25 sage leaves, left whole
  • Sea salt and pepper, to taste

Instructions

Preheat oven to 400°. Coat all sides of the pumpkin and garlic cloves with the olive oil, and sprinkle generously with sea salt and pepper. Place the pumpkin halves, cut side down, on a parchment-lined baking sheet. Place two garlic cloves under each half. Transfer to the oven, and roast until tender, about 40-45 minutes. Remove from the oven and let cool.

While the pumpkin cooks, mix the semolina flour and the all-purpose flour in a large mixing bowl. Add the aquafaba and the water, and mix well with your hands, until you obtain a soft and uniform ball of dough. If the dough is too wet, add a little flour. If it is too dry, add a little water, one teaspoon at a time. Place the ball of dough in a plastic wrap and place in the fridge to rest for 40 minutes.

While the dough rests, scoop out 1 cup of flesh from the roasted pumpkin. Keep the rest for another use, like in a soup, or in a sauce. Transfer the flesh to a food processor. Peel the garlic cloves and add to the food processor. Add the toasted pecans, the cinnamon, the cloves, the nutmeg, 1 tablespoon of the butter, the maple syrup, and 1/4 teaspoon sea salt. Process until smooth. Set aside.

After resting time, remove the dough from the fridge and from the plastic wrap. On a lightly flour-dusted surface, roll out the dough, using a rolling pin, until smooth and very thin. Using a 2-in cookie cutter, or any other round cup similar in diameter, cut dough into circles. Make a ball with the unused dough, and roll out again until smooth and thin. Cut out more circles, until you use all the dough.

Scoop out a very scant teaspoon of pumpkin mixture in the center of half the circles (the “bottoms”). Using your fingers, spread a small amount of water around the inside perimeter of the dough “tops”. Place them on top of the filled dough bottoms and press around the edges to seal properly. You should have approximately 40 raviolis.

Heat the remaining 8 tablespoons butter in a small saucepan, over medium-high heat. Add the sage leaves and cook until they are crispy and the butter is golden brown, approximately 5-10 minutes, adjusting the heat to make sure not to burn the butter.

While the butter cooks, cook the raviolis. Place them, without overcrowding, in a large pot of salted boiling water, for 4-5 minutes. I did mine in two batches.

Place some raviolis in a plate, spoon some of the sage butter on top, along with the crispy sage, and garnish with toasted pecans. Bon appétit!

Notes

I like cutting up the leftover pumpkin and roasting while I make the raviolis. Simply cut into small cubes, season with olive oil, sea salt and pepper. Place in a 425˚ oven for 15-20 minutes. Serve with the raviolis along with the sage brown butter, the crispy sage, and the toasted pecans.

Keywords: pumpkin, ravioli, pecan

Did you make this recipe?

Share a photo and tag us — we can’t wait to see what you’ve made!


Print

Raviolis à la citrouille avec beurre à la sauge

Lorsque l’automne se fait sentir en Arizona (je parle de températures plutôt clémentes, dans les vingt degrés), on sent le besoin de concocter des petits plats réconfortants, aux épices qui annoncent le temps des récoltes. Ces raviolis sont superbes pour un repas officiel, mais sont aussi un plaisir à préparer avec les enfants. Vous devrez y mettre un peu de temps, certes, mais les étapes sont toutes faciles à suivre.

  • Author: Karine K
  • Prep Time: 30 minutes
  • Cook Time: 45 minutes
  • Total Time: 1 hour 15 minutes
  • Yield: 4 portions 1x

Ingredients

Scale
  • 1 petite citrouille à cuire, coupée en deux et épépinée
  • 4 gousses d’ail entières
  • 2 c. à soupe d’huile d’olive
  • 1 tasse de farine de semoule
  • 1 tasse de farine tout usage
  • 1/2 tasse d’aquafaba (liquide d’une boîte de pois chiches, garder les pois chiches pour un autre usage, comme cette soupe)
  • 3 c. à soupe d’eau
  • 1/2 tasse de pacanes rôties, et plus pour la garniture
  • 1/8 c. à thé de cannelle
  • 1/8 c. à thé de clou de girofle moulu
  • 1/8 c. à thé de muscade
  • 9 c. à soupe de beurre, divisé
  • 1 c. à thé de sirop d’érable
  • 25 feuilles de sauge entières
  • Sel de mer et poivre, au goût

Instructions

Préchauffer le four à 400°. Badigeonner la citrouille et les gousses d’ail avec l’huile d’olive et assaisonner généreusement de sel de mer et de poivre. Placer les moitiés de citrouille, partie coupée vers le bas, sur une plaque de cuisson préalablement recouverte de papier parchemin. Insérer les gousses d’ail sous chacune des moitiés. Mettre au four et cuire jusqu’à ce que la courge soit tendre, environ 40-45 minutes. Retirer du four et laisser refroidir.

Dans un grand bol, mélanger la farine de semoule et la farine tout usage. Ajouter l’aquafaba et l’eau. Bien mélanger avec les mains, jusqu’à l’obtention d’une pâte lisse et uniforme. Si la pâte est trop mouillée, ajouter de la farine. Si elle est trop sèche, ajouter un peu d’eau, une cuillère à thé à la fois. Placer la pâte dans un papier plastique et mettre au réfrigérateur pendant 40 minutes.

Pendant que la pâte repose au réfrigérateur, mesurer 1 tasse de citrouille. Conserver les restes au réfrigérateur pour une autre utilisation. Mettre la tasse de citrouille dans le bol d’un robot culinaire. Ajouter les pacanes rôties, la cannelle, le clou de girofle, la muscade, 1 c. à soupe de beurre et le sirop d’érable. Pulser jusqu’à l’obtention d’un mélange onctueux. Réserver.

Retirer la pâte du réfrigérateur. Sur une surface légèrement enfarinée, rouler la pâte très mince. En utilisant un emporte-pièce de deux pouces de diamètre, ou un contenant avec un diamètre semblable, couper la pâte en cercles. Faire une boule avec les restes de pâte, et rouler à nouveau et découper le reste des cercles, jusqu’à ce qu’il n’y ait plus de pâte.

Mesurer 1 petite cuillère à thé de garniture et déposer dans le milieu de la moitié des cercles (les “fonds”). Avec les doigts, mouiller le périmètre de chacun des “dessus” et déposer sur les “fonds” garnis. Presser sur les rebords afin de les faire adhérer. Vous devriez obtenir environ 40 raviolis.

Chauffer le reste du beurre (8 c. à soupe), à feu moyen-élevé. Ajouter les feuilles de sauge et cuire jusqu’à ce qu’elle soient croustillantes et que le beurre soit doré, environ 5 à 10 minutes.

Pendant que le beurre à la sauge cuit, faire cuire les raviolis. Placer dans une grande casserole d’eau salée bouillante, pendant 4 à 5 minutes. J’ai cuit les miens en deux fois.

Placer les raviolis dans une assiette et garnir de beurre, de feuilles de sauge croustillante, et de pacanes rôties. Bon appétit!

Notes

Parfois, je coupe les restes de citrouilles en petits cubes. J’assaisonne librement d’huile d’olive, de sel de mer et de poivre, et je place au four, à 425˚ pendant 15 à 20 minutes. Vous pouvez donc servir les raviolis avec le beurre à la sauge, les feuilles de sauge, les pacanes et la citrouille rôtie.

Keywords: citrouille, raviolis, pacanes

Did you make this recipe?

Share a photo and tag us — we can’t wait to see what you’ve made!

Kale and Spelt Salad with Peach and Pine Nuts

Kale and Spelt Salad with Peach and Pine Nuts | livitygardens.com

This Kale and Spelt Salad with Peach and Pine Nuts really started as a kitchen sink salad, but ended up being something I made three times in a week. So yes, it’s this good. I had kale from the farmers market that I wanted to use as well as some cherry tomatoes. I knew I wanted a grain in there, I love kale salads with grains, so I opted for spelt this time, but feel free to use freekeh, farro, or barley. Any chewy grain will do.

If you make this recipe, I’d love to see it. Please tag @LivityGardens on Instagram and use the hashtag #LivityGardens.

Print

Kale and Spelt Salad with Peach and Pine Nuts

  • Author: Karine K

Ingredients

Scale
  • 1 cup spelt, cooked according to package directions
  • 1 bunch Tuscan kale (lacinato), stemmed and sliced thin
  • Fresh juice from 2 lemons
  • Olive oil, to taste
  • Sea salt and pepper, to taste
  • 1 peach, diced
  • 1 quart cherry tomatoes, halved
  • Kernels from one ear of fresh corn
  • 1/2 cup red onion, diced
  • 1 big handful baby spinach
  • 1 zucchini, diced
  • 1/3 cup pine nuts, toasted
  • 1 clove garlic, minced
  • Toppings: micro greens or sprouts, hemp seeds, red pepper flakes

Instructions

While you cook the spelt according to package directions, place the sliced kale in a large bowl, drizzle with a bit of olive oil, the juice of half a lemon, and a pinch of sea salt. Massage with your hands for about 2 minutes. Make the vinaigrette by mixing some olive oil, lemon juice, minced garlic clove, and sea salt and pepper, to taste. Assemble the salad by adding the drained spelt to the kale, mix well. Add the peach, tomatoes, corn, red onion, baby spinach, and zucchini. Mix delicately. Add the vinaigrette, top with the pine nuts and gently mix. Add the toppings and serve. Bon appétit!

Did you make this recipe?

Share a photo and tag us — we can’t wait to see what you’ve made!


Print

Salade de kale et d’épeautre avec pêche et noix de pin

  • Author: Karine K

Ingredients

Scale
  • 1 tasse d’épeautre, cuit selon les directives sur l’emballage
  • 1 botte de chou kale toscan (lacinato), paré et tranché mince
  • Jus de 2 citrons
  • Huile d’olive, au goût
  • Sel de mer et poivre, au goût
  • 1 pêche, coupée en dés
  • 1 emballage de tomates cerises, coupées en deux
  • Grains de maïs d’un épi
  • 1/2 tasse d’oignon rouge, coupé en dés
  • 1 grosse poignée d’épinards frais
  • 1 zucchini, coupé en dés
  • 1/3 tasse de noix de pin, rôties
  • 1 gousse d’ail, émincée
  • Garnitures: jeunes pousses, graines de chanvre, flocons de chili broyés

Instructions

Pendant la cuisson de l’épeautre, déposer le chou kale dans un grand bol et arroser du jus de citron, d’un trait d’huile d’olive et d’une pincée de sel de mer. Masser avec les mains pendant 2 minutes.

Pour faire la vinaigrette, combiner de l’huile d’olive, le jus de citron, l’ail émincée, le sel de mer et le poivre, au goût. Assembler la salade en ajoutant l’épeautre au chou kale en remuant. Ajouter les pêches, tomates, maïs, oignon rouge, épinards et zucchini. Ajouter la vinaigrette, garnir de noix de pin et mélanger délicatement. Ajouter les garnitures, si désiré, et servir. Bon appétit!

Did you make this recipe?

Share a photo and tag us — we can’t wait to see what you’ve made!

Wild Rice with Sautéed Mushrooms

Wild Rice with Sautéed Mushrooms

This Wild Rice with Sautéed Mushrooms is easy and healthy. A serving of wild rice contains about 6.5g pf protein. It also contains the beneficial amino acids lysine and methionine, as well as beneficial amounts of heart-healthy linolenic acid. It is also an excellent source of vitamins and minerals.

If you make this recipe, I’d love to see it. Please tag @LivityGardens on Instagram and use the hashtag #LivityGardens.

For more, check out this Vegetable Fried Rice: A Lunch at the Speed of Light.

Print

Wild Rice with Sautéed Mushrooms

  • Author: livitygardens
  • Prep Time: 10 minutes
  • Cook Time: 55 minutes
  • Total Time: 1 hour 5 minutes
  • Yield: 2 1x

Ingredients

Scale
  • 1 cup wild rice, rinsed well
  • 4 cups mushroom or vegetable broth, or water, plus 4 tablespoons
  • 1 tablespoon olive oil
  • 1 tablespoon plant butter
  • 16 oz mushrooms (cremini, button or shiitake), cleaned and sliced thin
  • 2 cloves garlic, smashed
  • 1 sprig fresh thyme
  • 1/4 cup dry white wine
  • 1/3 cup shallots, minced
  • 2 tablespoons fresh parsley, minced
  • Sea salt and pepper, to taste

Instructions

Bring broth and wild rice to a boil in a medium saucepan. Reduce the heat to an active simmer, cover, and cook for 45 minutes. Drain and set aside.

In the meantime, in a large skillet, heat the olive oil and butter over medium-high heat. Add the mushrooms, garlic and thyme, and sauté until soft and golden, about 6-7 minutes. Season to taste with salt and pepper.

Deglaze the skillet with the white wine and let evaporate 2 minutes. Remove thyme sprig and discard. Add the shallots and wild rice, and mix well until heated through, adding broth by the tablespoon, if needed. Remove to a serving platter and sprinkle with the fresh parsley.

Did you make this recipe?

Share a photo and tag us — we can’t wait to see what you’ve made!


Print

Riz sauvage aux champignons

  • Author: livitygardens
  • Prep Time: 10 minutes
  • Cook Time: 55 minutes
  • Total Time: 1 hour 5 minutes
  • Yield: 2 portions 1x

Ingredients

Scale
  • 1 tasse de riz sauvage, bien rinsé
  • 4 tasses de bouillon de champignon ou de légumes, ou d’eau, plus 4 c. à soupe
  • 1 c. à souper d’huile d’olive
  • 1 c. à soupe de beurre végé
  • 16 onces de champignons (cremini, café ou shiitake), bien nettoyés et tranchés minces
  • 2 gousses d’ail, écrasées
  • 1 branche de thym frais
  • 1/4 tasse de vin blanc sec
  • 1/3 tasse d’échalotes françaises, émincées
  • 2 c. à soupe de persil frais, émincé
  • Sel de mer et poivre, au goût

Instructions

Dans une casserole moyenne, porter le riz et le bouillon à ébullition. Réduire le feu, couvrir, et laisser mijoter pendant 45 minutes. Égoutter et réserver.

Pendant que le riz cuit, dans une grande poêle, faire chauffer l’huile d’olive et le beurre à feu moyen-élevé. Ajouter les champignons, l’ail et le thym. Saler et poivrer, au goût. Faire revenir pendant 6-7 minutes, jusqu’à ce que les champignons soient dorés.

Déglacer la poêle avec le vin blanc et laisser évaporer 2 minutes. Retirer la branche de thym. Ajouter les échalotes et le riz, et bien mélanger, en ajoutant des c. à soupe de bouillon, si trop sec. Servir garni du persil frais.

Did you make this recipe?

Share a photo and tag us — we can’t wait to see what you’ve made!

My Take on Mac and Cheese

My Take on Mac and Cheese | livitygardens.com
My Take on Mac and Cheese

I know, there are many plant-based versions of mac and cheese out there. So why would you consider my take on mac and cheese? Because it’s tasty, easy, healthy, and it doesn’t require any heavily processed ingredients. Ready? Get on it!

If you make this recipe, I’d love to see it. Please tag @LivityGardens on Instagram and use the hashtag #LivityGardens.

Print

My Take on Mac and Cheese

I would suggest you cook your squash the day before or the morning of. It’s not a hard process, the oven does all the work, but having this done will cut your recipe making time significantly. All you have to do is preheat the oven to 400˚. Prick the squash with a sharp knife four times, place the squash directly on the oven rack and roast for one hour. Remove from the oven and let cool. Once cool enough to handle, peel, seed and cut into cubes. You now have cooked butternut squash flesh!

  • Author: livitygardens
  • Prep Time: 5 minutes
  • Cook Time: 1 hour and 8 minutes
  • Total Time: 1 hour 13 minutes
  • Yield: 6 portions 1x

Ingredients

Scale
  • 1 butternut squash, cooked and diced (see description above to see how I do)
  • 1/2 cup raw cashews, soaked overnight or 30 minutes in hot water, rinsed and drained
  • 2 teaspoons olive oil
  • 1 large onion, diced
  • 1/2 teaspoon garlic powder
  • 1/4 teaspoon smoked paprika
  • 1/4 teaspoon ground turmeric
  • 2 teaspoons each sea salt and pepper
  • 1/2 cup plant-based milk (I use oat milk)
  • 1 teaspoon Dijon mustard
  • 2 tablespoons lemon juice
  • 1 package macaroni or fusilli pasta, cooked

Instructions

Heat the olive oil in a skillet over medium-high heat. Add the onion and cook, stirring occasionally, until the onion turns a deep golden color and is nicely caramelized, about 7-8 minutes. Add the garlic powder, smoked paprika and turmeric. Cook, stirring, for an additional two minutes. Remove from the heat.

In a high-speed blender, place the squash, the cashews, the onion mixture, plant-based milk, Dijon mustard, lemon juice, and sea salt and pepper. Blend until silky smooth.

In a large pot or bowl, mix the pasta with the desired amount of sauce and serve. I like mine with crispy sage or minced fresh parsley, for a more adult version. You may also keep aside some cubed squash and fry them in a bit of olive oil and a sprig of rosemary. Serve atop the pasta. Either way, all yummy!

Keywords: mac and cheese, mac, pasta, butternut squash, kids meal, squash

Did you make this recipe?

Share a photo and tag us — we can’t wait to see what you’ve made!


Print

Macaroni au fromage végé et santé

Je vous suggère de cuire votre courge butternut la veille ou le matin même. Ce n’est pas un processus complexe, le four fait le gros du travail, mais ceci coupera le temps d’assemblage de la recette de façon significative. Pour ce faire, préchauffez le four à 400˚. Faites quatre petites incisions dans la courge à l’aide d’un petit couteau. Placez la courge directement sur la grille du four et cuire pendant une heure. Retirez du four et laissez refroidir. Vous pouvez ensuite peler et retirer les graines. Coupez ensuite en cubes et voilà!

  • Author: livitygardens
  • Prep Time: 5 minutes
  • Cook Time: 1 heure 8 minutes
  • Total Time: 1 heure 15 minutes
  • Yield: 6 portions 1x

Ingredients

Scale
  • 1 courge butternut, cuite et coupée en cubes (voir la description plus haut pour voir comment je fais)
  • 1/2 tasse de noix de cajou brutes, trempées toute une nuit ou 30 minutes dans l’eau chaude
  • 2 c. à thé d’huile d’olive
  • 1 gros oignon, coupé en dés
  • 1/2 c. à thé de poudre d’ail
  • 1/4 c. à thé de paprika fumé
  • 1/4 c. à thé de curcuma moulu
  • 2 c. à thé chacun de sel de mer et de poivre
  • 1/2 tasse de lait de plante (j’utilise du lait d’avoine)
  • 1 c. à thé de moutarde de Dijon
  • 2 c. à soupe de jus de citron
  • 1 boîte de macaroni ou fusilli, cuits

Instructions

Chauffer l’huile d’olive dans une poêle à feu moyen-vif. Ajouter l’oignon et cuire, en brassant souvent, jusqu’à ce que l’oignon soit tendre et caramélisé, environ 7-8 minutes. Ajouter la poudre d’ail, le paprika fumé et le curcuma. Cuire, en brassant, deux minutes de plus. Retirer du feu.

Dans un mélangeur à haute vitesse, placer la courge, les noix de cajou, le mélange oignon et épices, le lait, la moutarde de Dijon, le jus de citron, et le sel de mer et poivre. Mélanger jusqu’à l’obtention d’une texture lisse. Goûter et ajuster les assaisonnements.

Dans une grande casserole ou un grand bol, mélanger les pâtes cuites avec la quantité de sauce désirée. J’aime bien garnir mon macaroni avec de la sauge croustillante ou du persil frais haché. Vous pouvez aussi garder des cubes de courge et les faire sauter dans l’huile d’olive avec une branche de romarin, pour une version plus adulte. Quelle que soit la garniture, ou même sans, c’est délicieux!

Keywords: macaroni au fromage, enfants, courge butternut, courge, pâtes, pasta

Did you make this recipe?

Share a photo and tag us — we can’t wait to see what you’ve made!